Establishing a Wi-Fi connection
Like I mentioned in the previous chapter, the ESP8266 can operate in three different modes: Wi-Fi station, Wi-Fi access point, and both at the same time. We'll start by looking at the configuration of a Wi-Fi station.
Station mode
Connecting to one specific network
#include <ESP8266WiFi.h>        // Include the Wi-Fi library

const char* ssid     = "SSID";         // The SSID (name) of the Wi-Fi network you want to connect to
const char* password = "PASSWORD";     // The password of the Wi-Fi network

void setup() {
  Serial.begin(115200);         // Start the Serial communication to send messages to the computer
  delay(10);
  Serial.println('\n');

  WiFi.begin(ssid, password);             // Connect to the network
  Serial.print("Connecting to ");
  Serial.print(ssid); Serial.println(" ...");

  int i = 0;
  while (WiFi.status() != WL_CONNECTED) { // Wait for the Wi-Fi to connect
    delay(1000);
    Serial.print(++i); Serial.print(' ');
  }

  Serial.println('\n');
  Serial.println("Connection established!");
  Serial.print("IP address:\t");
  Serial.println(WiFi.localIP());         // Send the IP address of the ESP8266 to the computer
}

void loop() { }
The code to connect to a wireless access point is relatively straightforward: enter the SSID and the password of the network you want to connect to, and call the
WiFi.beginfunction. Then wait for the connection to complete, et voilà, your ESP8266 is now connected to your Local Area Network.
Don't believe me? I'll prove it to you: open the Serial monitor (CTRL+SHIFT+M) and upload the sketch. You should see something like this:
Connecting to SSID ...
1 2 3 4 5 6 ...

Connection established!
IP address: 192.168.1.3
Now go to your computer and open up a terminal: On Windows, search for "Command Prompt", on Mac or Linux, search for "Terminal". You could also use the shortcuts: on Windows, hit + R, type "cmd" and hit enter, on Linux, use
CTRL+ALT+T.
Next, type
ping, and then the IP address you received in the Serial monitor. If you're on Mac or Linux, use
CTRL+Cto stop it after a couple of lines. The output should look something like this:
user@computername:~$ ping 192.168.1.3
PING 192.168.1.3 (192.168.1.3) 56(84) bytes of data.
64 bytes from 192.168.1.3: icmp_seq=1 ttl=128 time=6.38 ms
64 bytes from 192.168.1.3: icmp_seq=2 ttl=128 time=45.2 ms
64 bytes from 192.168.1.3: icmp_seq=3 ttl=128 time=69.1 ms
64 bytes from 192.168.1.3: icmp_seq=4 ttl=128 time=94.0 ms
64 bytes from 192.168.1.3: icmp_seq=5 ttl=128 time=20.5 ms
64 bytes from 192.168.1.3: icmp_seq=6 ttl=128 time=7.37 ms
^C
--- 192.168.1.3 ping statistics ---
6 packets transmitted, 6 received, 0% packet loss, time 5003ms
rtt min/avg/max/mdev = 6.384/40.463/94.047/32.588 ms
The ping command sends small packets to the IP address of the ESP8266. When the ESP receives such a packet, it sends it back to the sender. Ping is part of the second layer of the TCP/IP stack, the Internet layer. It relies on both the Data Link layer (Wi-Fi) and the Internet Protocol*.
You can see that in the example above, we sent 6 packets to the ESP, and we also received 6 response (echo) packets. This tells us that the Data Link, the Wi-Fi connection, and the Internet Protocol are working correctly.
We now know that the ESP can successfully communicate with other devices on the network, and if your local network is online (if it is connected to the Internet via your modem), the ESP can also communicate with any device on the web !
Ping is a great tool to check if the ESP (or any device, really) is still connected to the network, and if it's still working fine.
One drawback is that IP addresses can change over time, but that's a problem we'll address in one of the following chapters ...
(*) I'm simplifying things a bit here. Actually, ping is part of the Internet Control Message Protocol (ICMP), that's also part of the second layer, just like the Internet Protocol. Don't worry too much about it, just remember that if you can send ping packets to a device, you can also send IP packets.
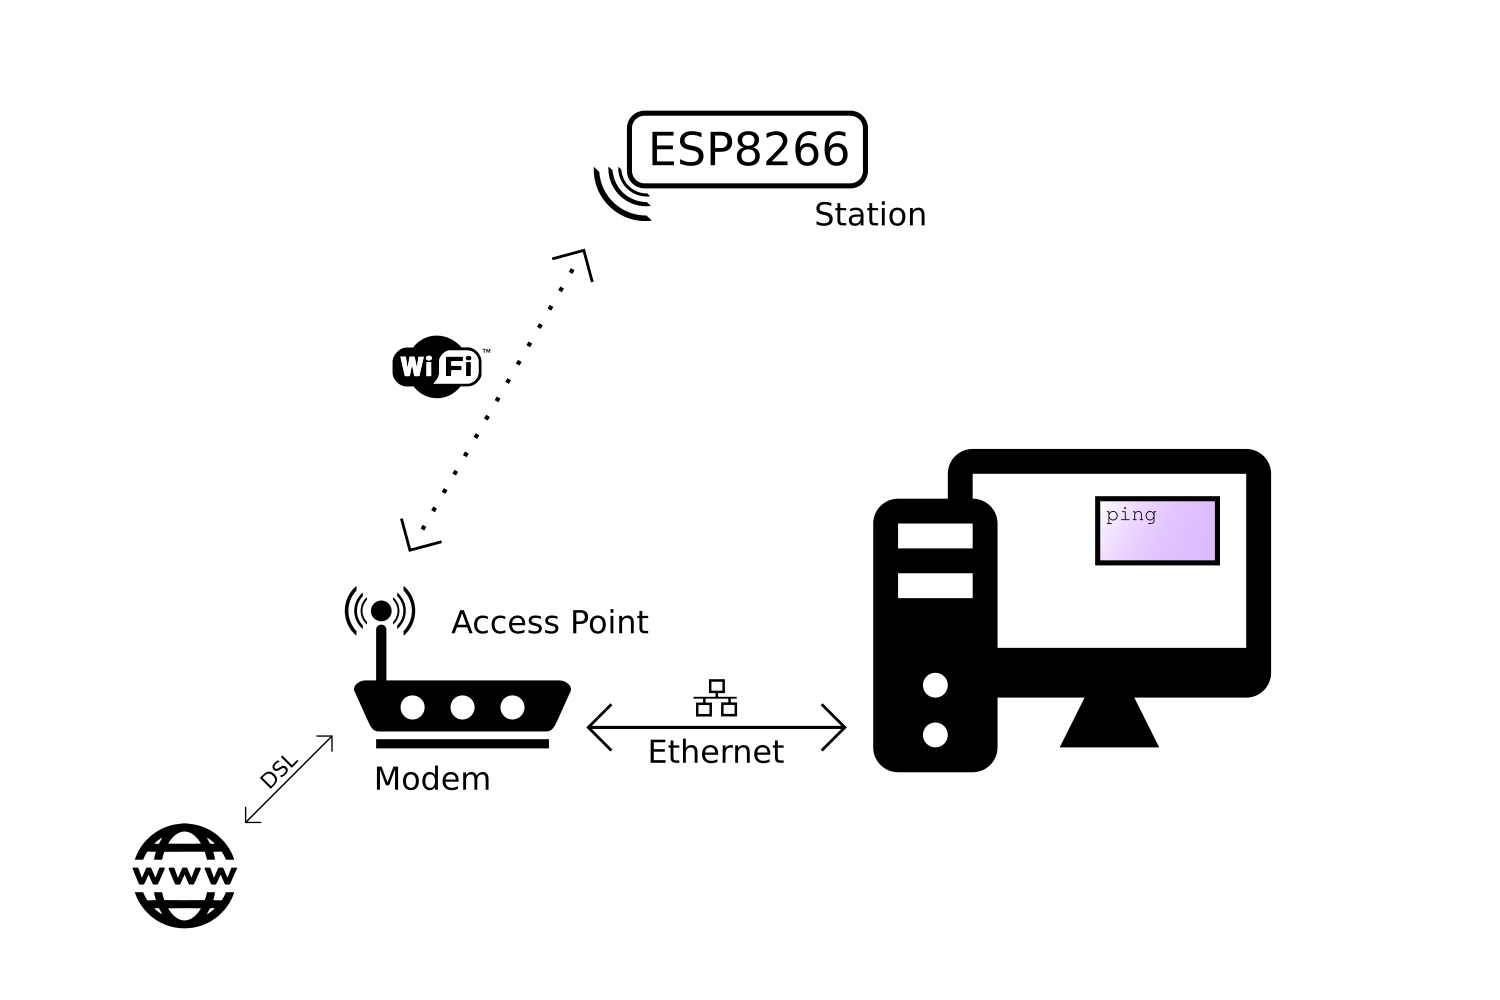
The device with the antenna serves many different purposes:
- Access point: Other Wi-Fi devices can connect to it, to be part of the local network.
- Router: It routes IP packets to the right sub-nets so that they will arrive at their destination. E.g. if the computer sends a message that is meant for the ESP over the Ethernet sub-net, the router will send the packet to the Wi-Fi sub-net, because it knows that's where the ESP is.
- Modem: if the router can't find the addressee on the local network, the packet will be passed on to the integrated modem, and it will be sent to the Internet Service Provider over a DSL line, heading for the Internet, where lots of other routers will try to get the packet to the right destination.
But in reality, you don't have to worry too much about it, because it's all done for you, in a fraction of a second without you even noticing it!
Automatically connect to the strongest network
The sketch above might be enough for your specific application, but if you need to be able to connect to multiple Wi-Fi networks, for example the Wi-Fi at home and the Wi-Fi at the office, it won't work.
To solve this problem, we'll use the Wi-Fi-Multi library: You can add as many networks as you like, and it automatically connects to the one with the strongest signal.
#include <ESP8266WiFi.h>        // Include the Wi-Fi library
#include <ESP8266WiFiMulti.h>   // Include the Wi-Fi-Multi library

ESP8266WiFiMulti wifiMulti;     // Create an instance of the ESP8266WiFiMulti class, called 'wifiMulti'

void setup() {
  Serial.begin(115200);         // Start the Serial communication to send messages to the computer
  delay(10);
  Serial.println('\n');

  wifiMulti.addAP("ssid_from_AP_1", "your_password_for_AP_1");   // add Wi-Fi networks you want to connect to
  wifiMulti.addAP("ssid_from_AP_2", "your_password_for_AP_2");
  wifiMulti.addAP("ssid_from_AP_3", "your_password_for_AP_3");

  Serial.println("Connecting ...");
  int i = 0;
  while (wifiMulti.run() != WL_CONNECTED) { // Wait for the Wi-Fi to connect: scan for Wi-Fi networks, and connect to the strongest of the networks above
    delay(1000);
    Serial.print('.');
  }
  Serial.println('\n');
  Serial.print("Connected to ");
  Serial.println(WiFi.SSID());              // Tell us what network we're connected to
  Serial.print("IP address:\t");
  Serial.println(WiFi.localIP());           // Send the IP address of the ESP8266 to the computer
}

void loop() { }
Access Point mode
To configure the ESP8266 as an access point, to allow other devices like smartphones or laptops to connect to it, you can use the softAP function:
#include <ESP8266WiFi.h>        // Include the Wi-Fi library

const char *ssid = "ESP8266 Access Point"; // The name of the Wi-Fi network that will be created
const char *password = "thereisnospoon";   // The password required to connect to it, leave blank for an open network

void setup() {
  Serial.begin(115200);
  delay(10);
  Serial.println('\n');

  WiFi.softAP(ssid, password);             // Start the access point
  Serial.print("Access Point \"");
  Serial.print(ssid);
  Serial.println("\" started");

  Serial.print("IP address:\t");
  Serial.println(WiFi.softAPIP());         // Send the IP address of the ESP8266 to the computer
}

void loop() { }
To see if it works, open the Wi-Fi settings on your computer, look for a network called "ESP8266 Access Point", enter the password "thereisnospoon", and connect to it. Then open a terminal, and ping to 192.168.4.1 (this is the default IP address of our ESP AP). You'll see that the ESP responds to your pings.
However, if you try to go to an online website, you'll get a timeout or a DNS error. This is because the ESP itself is not connected to the internet. The sub-net that consists of the ESP and the computer is not connected to any other networks, so there's no way for a packet on this network to make it to the Internet.
If you connected a second station to the ESP access point on the other hand, you would be able to ping from one station to the other without problems, because they're on the same network.