Compiling Optiboot - ATmega328P at custom frequency
Pieter PThis is a guide to use the ATmega328P (the microcontroller of an Arduino UNO) with a custom crystal, and run it at
a different frequency than the standard 16 MHz.
Downloading Optiboot
The Arduino has a bootloader in order to be able to upload sketches over the UART (serial) connection. When running
at a different clock speed, you have to recompile the bootloader. To do this, you need Optiboot.
First, install git (if you haven't already):
Then clone Optiboot:
Next, go to the 'bootloaders' folder of your Arduino IDE installation, for example:
Rename the old 'optiboot' folder:
And replace it by the new version of Optiboot you just cloned:
sudo apt-get install gitThen clone Optiboot:
git clone https://github.com/Optiboot/optiboot.gitNext, go to the 'bootloaders' folder of your Arduino IDE installation, for example:
cd ~/opt/arduino-1.8.1/hardware/arduino/avr/bootloadersRename the old 'optiboot' folder:
mv optiboot optiboot.oldAnd replace it by the new version of Optiboot you just cloned:
cp -R ~/optiboot/optiboot/bootloaders/optiboot/ optiboot && cd optibootCompiling the Optiboot bootloader
Open the Makefile to add a new option with a custom frequency:
Then duplicate the atmega328 and atmega328_isp options, and rename them, for example, atmega328_12 and atmega328_12_isp. Change the CPU speeds, and save the file. The result could be something like this:
gedit MakefileThen duplicate the atmega328 and atmega328_isp options, and rename them, for example, atmega328_12 and atmega328_12_isp. Change the CPU speeds, and save the file. The result could be something like this:
#Atmega328p @12MHz
atmega328_12: TARGET = atmega328
atmega328_12: MCU_TARGET = atmega328p
atmega328_12: CFLAGS += $(COMMON_OPTIONS)
atmega328_12: AVR_FREQ = 12000000L
atmega328_12: LDSECTIONS  = -Wl,--section-start=.text=0x7e00 -Wl,--section-start=.version=0x7ffe
atmega328_12: $(PROGRAM)_atmega328_12.hex
atmega328_12: $(PROGRAM)_atmega328_12.lst

atmega328_12_isp: atmega328
atmega328_12_isp: TARGET = atmega328
atmega328_12_isp: MCU_TARGET = atmega328p
# 512 byte boot, SPIEN
atmega328_12_isp: HFUSE = DE
# Low power xtal (12MHz) 16KCK/14CK+65ms
atmega328_12_isp: LFUSE = FF
# 2.7V brownout
atmega328_12_isp: EFUSE = 05
atmega328_12_isp: isp
Now tell Optiboot to use the avr-gcc compiler that came with the Arduino IDE:
And compile the firmware:
The output should look something like this:
export ENV=arduinoAnd compile the firmware:
make atmega328_12The output should look something like this:
avr-gcc (GCC) 4.9.2
Copyright (C) 2014 Free Software Foundation, Inc.
This is free software; see the source for copying conditions.  There is NO
warranty; not even for MERCHANTABILITY or FITNESS FOR A PARTICULAR PURPOSE.

BAUD RATE CHECK: Desired: 115200, Real: 115200, UBRRL = 15, Error=0.0%
../../../../tools/avr/bin/avr-gcc -g -Wall -Os -fno-split-wide-types -mrelax -mmcu=atmega328p -DF_CPU=12000000L  -DBAUD_RATE=115200 -DLED_START_FLASHES=3        -c -o optiboot.o optiboot.c
../../../../tools/avr/bin/avr-gcc -g -Wall -Os -fno-split-wide-types -mrelax -mmcu=atmega328p -DF_CPU=12000000L  -DBAUD_RATE=115200 -DLED_START_FLASHES=3      -Wl,--section-start=.text=0x7e00 -Wl,--section-start=.version=0x7ffe -Wl,--relax -nostartfiles -nostdlib -o optiboot_atmega328_12.elf optiboot.o -lc
../../../../tools/avr/bin/avr-size optiboot_atmega328_12.elf
   text	   data	    bss	    dec	    hex	filename
    464	      0	      0	    464	    1d0	optiboot_atmega328_12.elf
../../../../tools/avr/bin/avr-objcopy -j .text -j .data -j .version --set-section-flags .version=alloc,load -O ihex optiboot_atmega328_12.elf optiboot_atmega328_12.hex
../../../../tools/avr/bin/avr-objdump -h -S optiboot_atmega328_12.elf > optiboot_atmega328_12.lst
Adding the option in the Arduino IDE
The next step is to add a new option in the Tools menu in the Arduino IDE.
Open the 'boards.txt' file for editing, for example:
You have to add a menu entry to select the speed, change the f_cpu value, and point to the right bootloader. Edit the 'uno' entry, so it looks like this:
gedit ~/opt/arduino-1.8.1/hardware/arduino/avr/boards.txtYou have to add a menu entry to select the speed, change the f_cpu value, and point to the right bootloader. Edit the 'uno' entry, so it looks like this:
uno.name=Arduino/Genuino Unouno.vid.0=0x2341uno.pid.0=0x0043uno.vid.1=0x2341uno.pid.1=0x0001uno.vid.2=0x2A03uno.pid.2=0x0043uno.vid.3=0x2341uno.pid.3=0x0243uno.upload.tool=avrdudeuno.upload.protocol=arduinouno.upload.maximum_size=32256uno.upload.maximum_data_size=2048uno.upload.speed=115200uno.bootloader.tool=avrdudeuno.bootloader.low_fuses=0xFFuno.bootloader.high_fuses=0xDEuno.bootloader.extended_fuses=0x05uno.bootloader.unlock_bits=0x3Funo.bootloader.lock_bits=0x0F# uno.bootloader.file=optiboot/optiboot_atmega328.hexuno.build.mcu=atmega328p# uno.build.f_cpu=16000000Luno.build.board=AVR_UNOuno.build.core=arduinouno.build.variant=standardmenu.speed=CPU Speeduno.menu.speed.16=16 MHzuno.menu.speed.12=12 MHzuno.menu.speed.16.bootloader.file=optiboot/optiboot_atmega328.hexuno.menu.speed.12.bootloader.file=optiboot/optiboot_atmega328_12.hexuno.menu.speed.16.build.f_cpu=16000000Luno.menu.speed.12.build.f_cpu=12000000L
Note that the original
f_cpu and bootloader.file lines are commented out. Also make sure
that the speeds and bootloader filenames are the same as the ones in the Optiboot Makefile.Restart the Arduino IDE for the changes to take effect. You should see the new options when opening the 'Tools'
menu.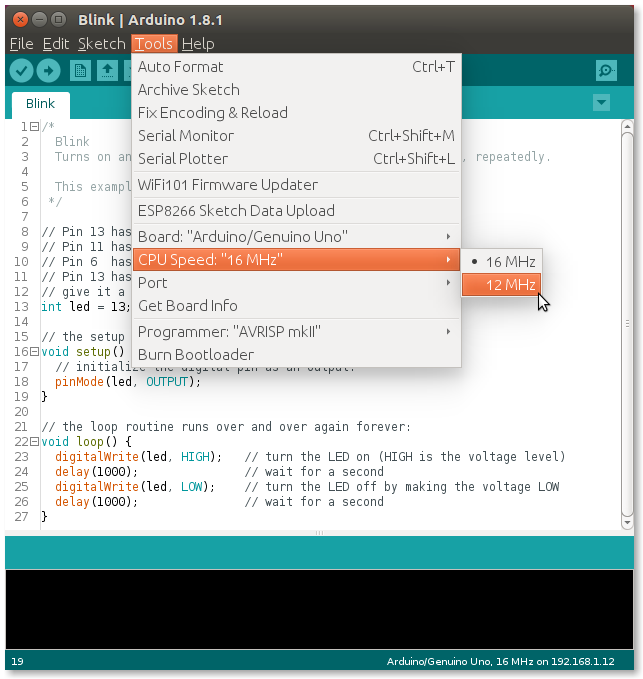
Flashing the bootloader to the ATmega328P
You'll need an Arduino Uno (or a second ATmega328P with bootloader + USB-UART converter, or an AVR ISP programmer)
to upload the bootloader to the ATmega328P.
Uploading the ArduinoISP firmware
Open the ArduinoISP firmware in the Arduino IDE (File > Examples > 11.ArduinoISP), and upload it to the
Arduino Uno that will be used for programming the target ATmega328P. Make sure that you have the right clock speed
selected in the Tools
> CPU Speed menu (16 MHz).
Connecting to the Arduino
First, connect the power and crystal to the target ATmega328P. Pins 8 & 22 go to ground, pins 7 & 20 go to
+5V. Connect the crystal oscillator to pins 9 & 10, with two 22pF capacitors from the 2 crystal pins to ground.
Pull the reset
pin (pin 1) high using a 10kΩ resistor. Add a 100nF bypass capacitor for stability.
Connect the SPI pins for programming: pin D13 of the programmer Arduino to pin 19 of the target ATmega, D12 to pin
18, and D11 to pin 17. Connect pin D10 to the reset pin of the target ATmega.
Check the result with the following image: 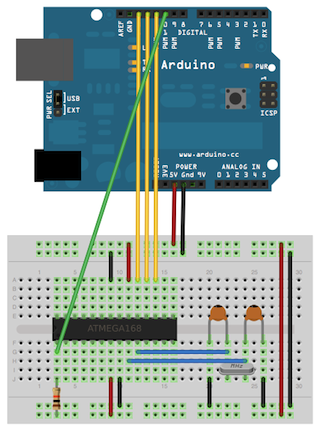 Image source: https://www.arduino.cc/en/Tutorial/ArduinoISP
Image source: https://www.arduino.cc/en/Tutorial/ArduinoISP
Finally, add a 10µF capacitor between the reset pin of the programmer Arduino and ground,
to prevent it from resetting while burning the bootloader.
Burning the bootloader
Now go to the Tools menu in the IDE, and under CPU Speed, select the new custom frequency. Then select "Arduino as
ISP" under Tools > Programmer. Select the serial port of the programmer Arduino, and click 'Burn Bootloader'.
The ATmega328P now has the bootloader installed, so you can upload sketches over UART.
Testing
Connect the ATmega328P to a USB-to-Serial converter (an FTDI module, for example): TX (pin 3) to RX, and RX (pin 2)
to TX. Connect the DTR pin of the FTDI to a 100nF capacitor, and connect the other lead of the capacitor to the
reset pin of the
ATmega. Add a diode with the anode to the reset pin, and the cathode to 5V.
Also add an LED (+ series resistor) between pin 19 (D13) and ground.
Also add an LED (+ series resistor) between pin 19 (D13) and ground.
Connect the Arduino to your computer, select the right port and the custom frequency, and try uploading
Blink.
The LED on D13 should start blinking.
The LED on D13 should start blinking.