Installation and Setup
Pieter PThis page describes how to download Raspberry Pi OS, flash it to an SD card, connect to the Pi over SSH, and how to set up your SSH keys so you can log on to the Pi without having to enter your password each time.
I intentionally kept this section quite brief, because there are countless tutorials online that go through the same steps, it is mainly here for the sake of self-containedness. If you need any help, have a look at the following official (and much more detailed) instructions:
- https://www.raspberrypi.com/documentation/computers/getting-started.html
- https://www.raspberrypi.com/documentation/computers/configuration.html
- https://www.raspberrypi.com/documentation/computers/remote-access.html
Download
Start by downloading a Raspberry Pi OS image from https://www.raspberrypi.org/software/operating-systems.
Install the operating system
You can install the operating system to an SD card using the following command:
unzip -p ~/Downloads/2021-05-07-raspios-buster-armhf-lite.zip | sudo dd of=/dev/mmcblk0 bs=4M conv=fsync
Before you run this command, make sure that you're writing to the correct device. In my case, my SD card appeared as
/dev/mmcblk0, but
it might differ on your system. When in doubt, you can use the lsblk command to list the storage
devices.
For more information, see https://www.raspberrypi.org/documentation/installation/installing-images/linux.md.
Enable SSH
Mount the SD card and create an empty file with the name ssh in the boot partition.
Enable Ethernet over USB (RPi Zero only)
Open the config.txt file in the boot partition, and append the following line to it:
dtoverlay=dwc2
In the file cmdline.txt, add the following option after the rootwait option (leave a
space before and after):
modules-load=dwc2,g_etherBoot the Pi
Ensure that you saved the files from the previous sections, safely remove the SD card, insert it into the Raspberry Pi and turn it on. Connect it to your network over Ethernet or WiFi.
Connect over USB (RPi Zero only)
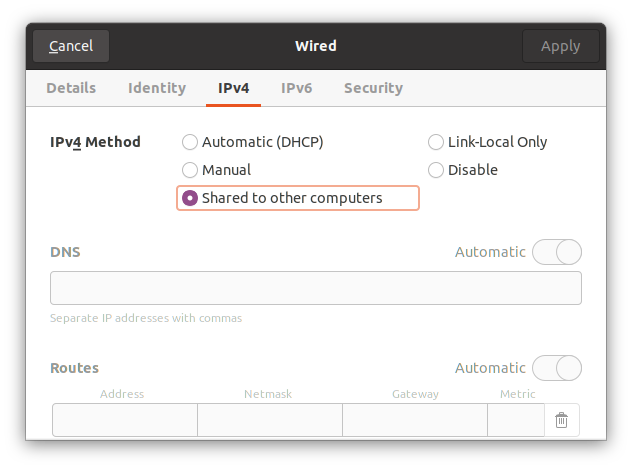
If you're using a Pi Zero without WiFi, you can connect it to your computer over USB and have it show up as a network interface. Use the correct USB port (the one labeled “USB”, not “PWR IN”).
Give the Pi some time to boot, and then open the network settings on you computer. The Pi should show up as a wired network connection. In the IPv4 and IPv6 settings, select “Shared to other computers” to share your internet connection with the Pi.
Log in to the Pi over SSH
Assuming that you have only one Raspberry Pi on the network, connect to it using
ssh pi@raspberrypi.local
The default password is raspberry, change it by running:
passwdSet up the hostname and SSH keys
Change the hostname and restart the mDNS service, then log out. Feel free to use a more appropriate hostname for your specific setup, but remember to change it in the following commands.
sudo hostnamectl set-hostname rpi0sudo service avahi-daemon restartexit
You're now at your computer's shell again. Create an SSH configuration for the Pi:
cat >> ~/.ssh/config << 'EOF'
Host RPi0
    HostName rpi0.local
    User pi
EOF
Add your public key to the Pi's authorized_keys, so you can connect to it without entering the
password each time:
ssh-copy-id -i ~/.ssh/id_rsa.pub RPi0If you don't have an SSH key pair yet, you can follow these instructions on how to create one: DigitalOcean - How to Set Up SSH Keys.
You can now try to connect to it without having to specify the hostname or username, and without having to enter your password:
ssh RPi0